FreeNAS is awesome. Also, FreeNAS is hard… I recently switched from a Synology device, and while I am already appreciating the increase in functionality and power, it’s certainly not as easy to do some basic tasks. One of those tasks is setting up a Time Machine share where all of my household Macs can back up. Between reading the tutorials and giving some trial and error myself, I think I have come up with a good solution.
And before I get started with the step by step guide, let me reiterate one thing: Permissions, Permissions, Permissions! If you ever find yourself banging your head against a wall because something in FreeNAS isn’t working as you expect it to, the likely culprit is permissions. Once you wrap your brain around them, though, things become more simple. Hopefully this guide helps put a foundation around that.

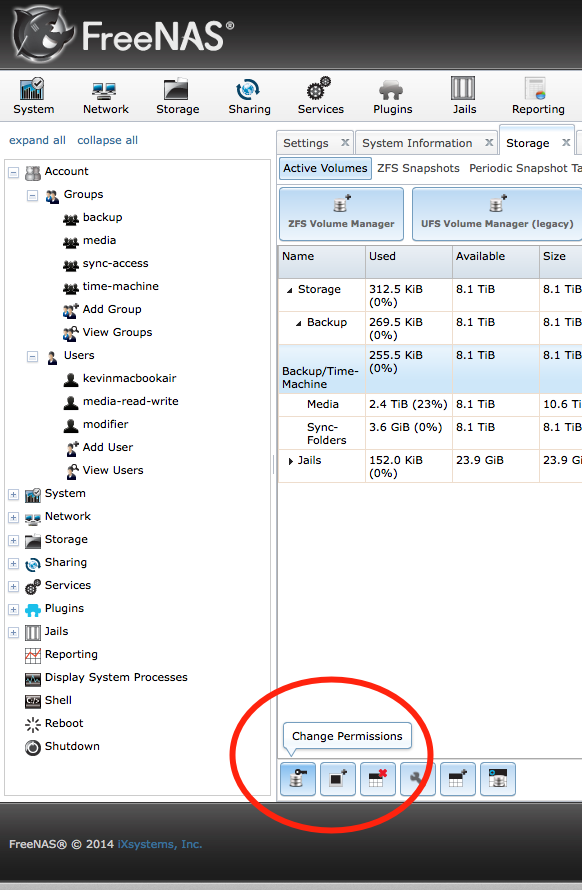
This article assumes that you have FreeNAS already up and running on your network and that you’re able to connect to the main home screen with your web browser. I recommend setting it a static IP, as well. Our first step will be to create a group / user for Time Machine backups.
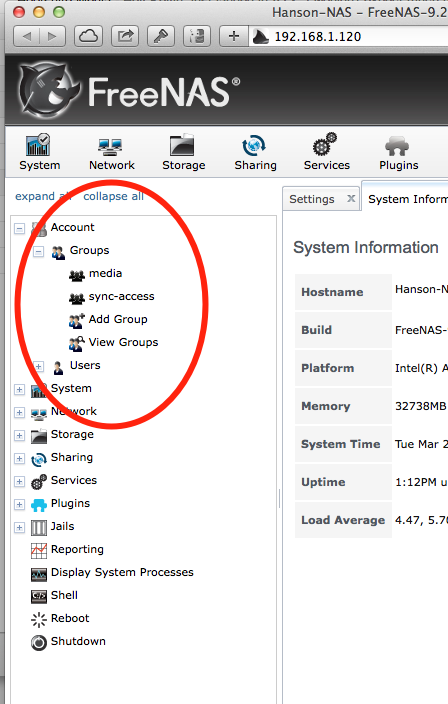
Under the “Account” section on the left, click “Groups,” and then click “Add Group.”
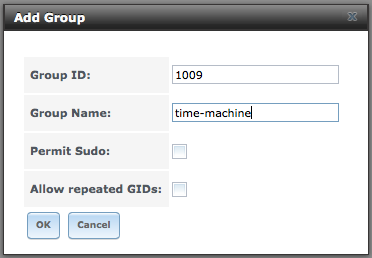
You don’t need to change the default value for the group ID, and put something like “time-machine” for the group name. Leave everything as default and click OK.
The next step is to create a ZFS dataset where we’re going to put the Time Machine backups. The dataset must be on a ZFS volume. I’m assuming you have already created a ZFS volume with your disks here, but if you haven’t stop reading this guide and go read the FreeNAS ZFS documentation here. If you have already created the volume, create a dataset. Datasets can be nested inside of other datasets so I actually have one dataset called “Backup” and inside of that one, I have one callled “Time-Machine” ~ it really just depends on how you want things set up.
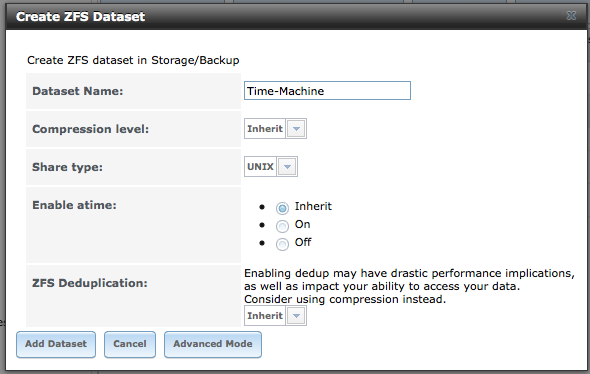
After you enter the name, “Time-Machine”, leave all of the default values alone. The below screenshot shows how I have “Time-Machine” nested inside of my Backup dataset.
So now we have a dataset. This is going to be where all of our Time Machine backups get saved. The next step is the most important and the one that has bitten me before… so don’t forget it. We need to change the permissions on the “Time-Machine” dataset. Recall that we initially created a group called “time-machine” – we are now going to set things up such that any user in the “time-machine” group can write to the “Time-Machine” dataset. Click on the “Time-Machine” dataset and then click on the icon with a key on it to change its permissions.
When you click that, a permissions dialog box will pop up.

I chose not to change the default user owner of “root.” However, definitely change the group owner. In the drop down box, the “time-machine” group that we previously created should be selectable. Click that and then make sure to have the boxes checked as I have in the image above. We want any user in the group to have read / write / execute privileges.
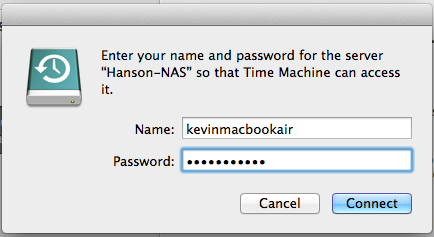
Click the “Change” button to have the new permissions take effect. Now it’s time to create a user for the Time Machine backup. I believe it is best to create a separate user for each computer (and I’ll explain why at the end of the post) so just create users that reflect that computer. For example, the user I’m creating is called “kevinmacbookair.”
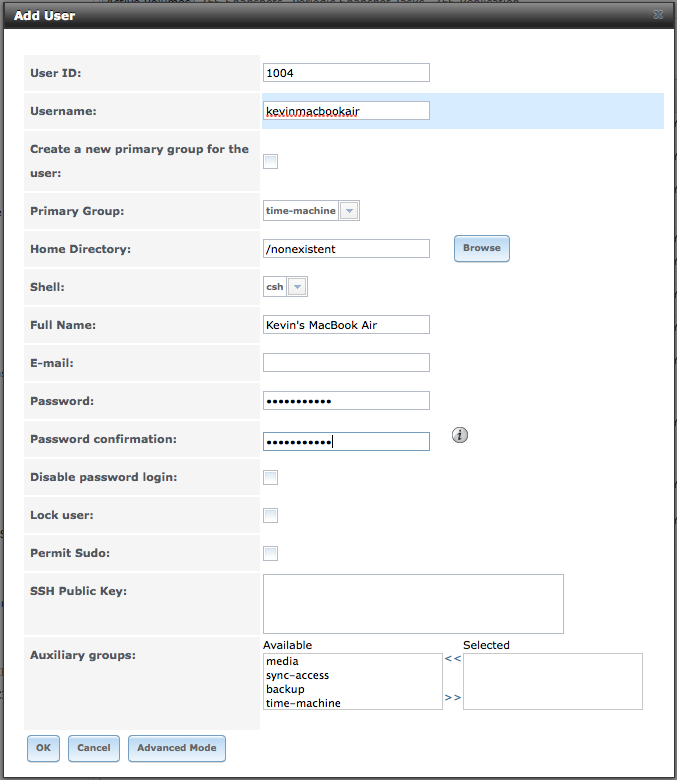
Once again, you navigate over to the left column to create a new user. Leave the “User ID” field as the default. Give your username a simple lowercase name like mine. Uncheck the box about creating a new primary group for the user. Instead, go to the drop down list and select “time-machine” in there. In the full name, put a descriptive name. Type in a password, and then you’re good to go.
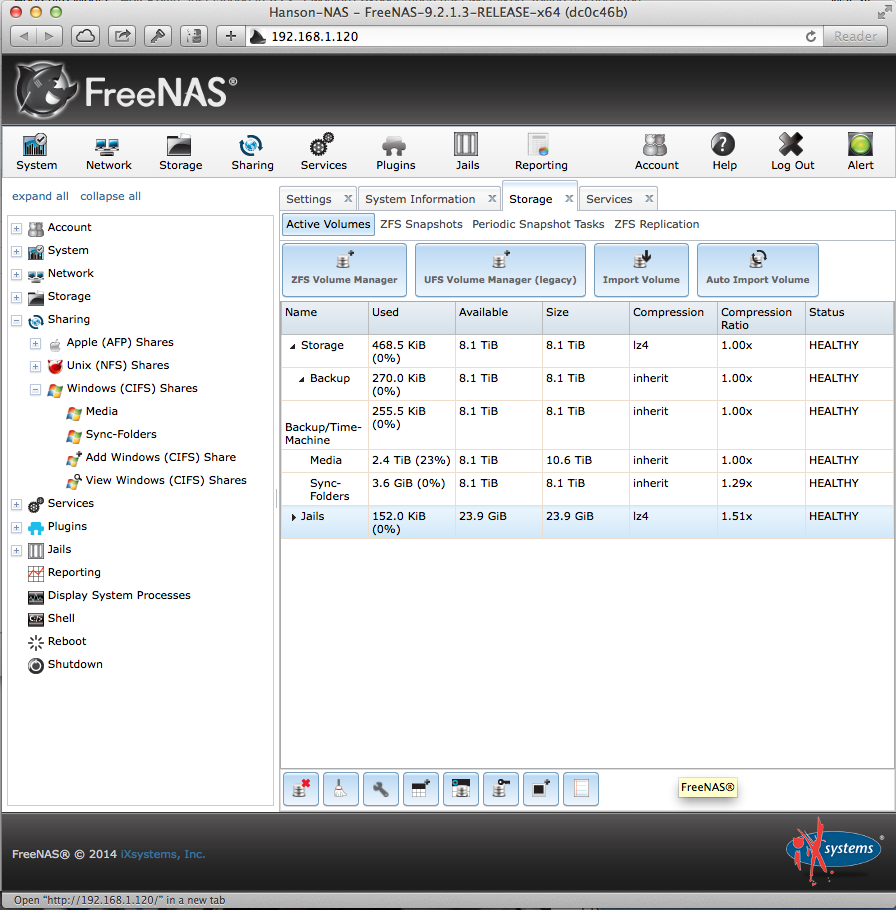
So what we’ve done so far is created a group called “time-machine” which has full access to the “Time Machine” dataset. Next we added a user that is part of the “time-machine” group. Easy! The last thing we need to do is create an AFP (Apple Filing Protocol) share that will broadcast this over the network so your Mac can see it. To do this, click the “Sharing” link on the column on the far left and click the button to create a new AFP share.
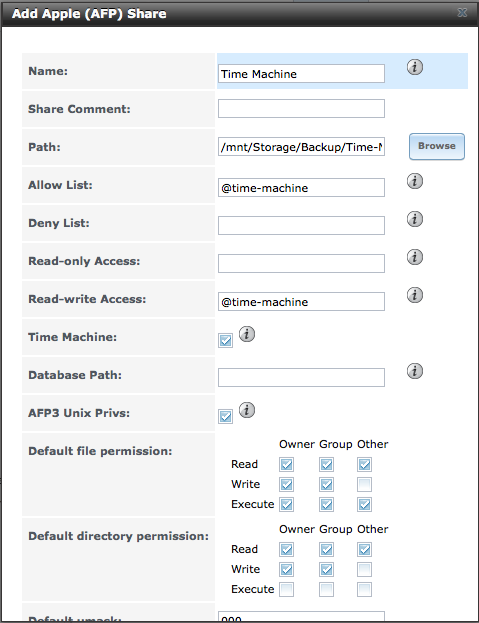
Name your share something you like, and then use the file browser to make sure that the “Path” is set to the ZFS dataset that we created for our Time Machine backups. Next, for the “Allow List” and “Read-write Access” fields, we want to put the group that we created, “time-machine” ~ however, because it’s a group and not a user, we need to put the “@” symbol in front of it: “@time-machine”. Next make, sure the “Time Machine” box is checked. Finally, take a look at those check boxes of privileges and make sure they match what’s listed above. Then click OK. At this point, we’re done with everything on the FreeNAS system. It’s now time to set up Time Machine on the Mac!
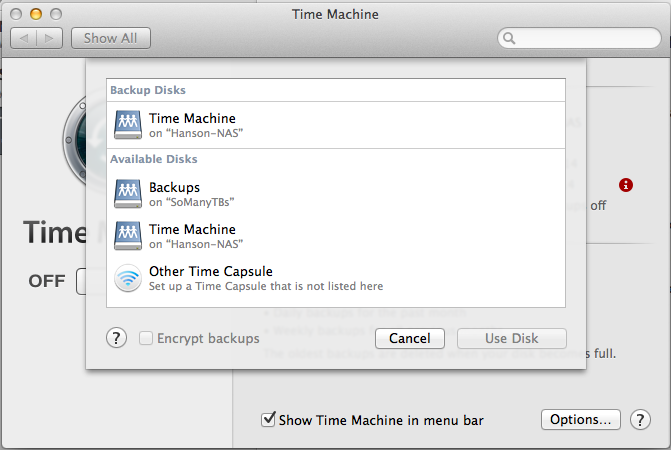
On the Mac, just open up the Time Machine preferences, and if you go to select a disk, you should find the one we created there! It will ask you for a username / password, and you want to make sure you enter the machine-specific one we created in FreeNAS, not your OS X username / password.
You should be golden! If you want to add more than one computer, you don’t need to add any new AFP shares or anything like that. Just create new users for each machine, and make sure that each user is part of the “time-machine” group that we created earlier. The final improvement to make this work even better would be for us to cap how much space each computer has to back up. For example, my MacBook Air has 256GB of space, and anything on my MacBook Air is also on my other machines so I really wouldn’t want to give it more than 300GB of usable space for historical backups. Time Machine will automatically delete the older ones if it runs out of room. On the contrary, my MacBook Pro is loaded up with all of my important data and I might want to give it 2x the space of its SSD. Right now there isn’t a great way to do this for multiple Macs in FreeNAS, but a feature is coming soon that will make it easy! This feature is per-user quotas. This will allow us to specify the maximum amount of space each user is allowed.
I hope this guide was useful!

I just use a separate dataset for each mac i'm backing up, and thus a separate share. this allows me to limit the max size each system can use.
Yes, but if you use a separate dataset, as you state, you must also create a separate share. This is not recommended by FreeNAS (saw that in the documentation) and it requires having 3 AFP shares. It does give you the ability to limit the max size each system can use, though. I'm hoping the user quotas come sooner than later. Apparently you can already do it with the CLI, but it's just not yet implemented in the GUI.
More shares on the system would cause more load, which is probably the reason why FreeNAS dosn't recommend it.This is what i use at home, i have a AFP share for Each Data set, and i have a Dataset for each Mac. Each dataset has a max size limit, works perfectly.
Glad to hear it's working well for you! As long as you're not having issues, then this seems reasonable as well. As long as you haven't had issues, both seem to be a just fine fit. How many Macs are you backing up?
I only have 1 at home, used to have 2.. but at one of my customer sites i've got 5 backing up with about 300 gb each.
i only have 1 at home, used to have 2. at work i have 5 using about 300gb each.
I tried this last year and found it unstable at that time. After a few days/weeks, Time Machine would tell me that there was something wrong with the backup on FreeNAS and it would have to restart the backup. Perhaps it's working better now.
The killer feature I wanted was being able to backup family computers remotely. In other words, I wanted to automate the backup for my Mom and brother over the Internet. I'm not aware of a way to make FreeNAS available to Time Machine clients outside my LAN without opening a hole in my firewall. That didn't seem safe.
So, for both stability and remote access, I switched from Time Machine to CrashPlan, which has never hiccuped for me in over a year I've used it.
Others are very happy about Time Machine, but I don't feel it's a good choice for a multi-user, network access backup. YMMY.
To add. AFP is unencrypted. Never user if not inside VPN.
Any thoughts on ZFS reduplication? I'd imagine that there'd be a lot of identical data between multiple macs' time machine backups.
I did a lot of reading up on FreeNAS, and apparently de-duplication is VERY CPU / disk intensive. I'm not sure what the space savings would be, but since I have multiple machines that are automatically backing up hourly, I didn't want that extra stress on the machine. FreeNAS does have LZ4 compression enabled by default, though… but according to the UI, I'm only getting a 1.01x compression ratio on that.
You can enable higher compression (which would be slower / more disk / cpu intensive) like gzip, and I actually have that enabled on an "Archive" dataset I use just for archiving data I don't access very frequently. I get a 1.3x compression ratio on that.
I don't have any experience with deduplication as of yet (Haven't used ZFS since a job a few years ago and I have not built my FreeNAS box yet), but gzip compression was no problem – just use one of the lower compression levels (e.g. not 9). Also, higher compression is more CPU intensive but less disk intensive since fewer bytes are written to/read from the disk, Depending on the speed of your disks and CPUs, speed might actually go up from compression.
I'll probably experiment with deduplication for the time machine volume since I don't expect it to get hit very hard in my case. Worst comes to worst I'll have to change it and start over.
Anyway, thanks for the guide! It will probably save me a bunch of time when I get around to this.
I tried this last year and found it unstable at that time. After a few days/weeks, Time Machine would tell me that there was something wrong with the backup on FreeNAS and it would have to restart the backup. Perhaps it's working better now.
You'll need to wait a bit longer to see the issues that Nello described and may never get bitten.
Once per month (I think at the beginning of the month, but maybe every 30-ish days?) OS X will verify the contents of any networked backups.
That is the point where you'll discover whether or not you've been bitten. You can also verify a backup manually by holding down the option key when you access the timemachine menu from the toolbar and choosing 'Verify Backup'.
The problem seems to be related to backups that don't run to completion. I see it frequently on my laptop and I believe that it happens when I wake the laptop up, which often fires off a time machine backup, then close it and take it to work with me.
I do not believe I have had a problem with a Mac Pro that never leaves its home next to my desk.
It is not a FreeNAS issue, it is yet another downside of OS X's crappy filesystem. Apparently there is a lot of magical code in OS X and the Apple TimeCapsule that makes the remote back more reliable but even there this problem comes up. I also see it on remote disks served up from an Raspberry Pi running Linux, one via netatalk and another via samba.
Thanks a bunch! Saved me heaps of time =)
Awesome article, awesome comments. Thanks to everyone that has posted here. You make my search that much easier.
Wow thanks so much for this! I've been fighting with Time Machine and FreeNAS for a while now and didn't realize groups were the answer.
Cheers!
Great tutorial! Big thanks!
Excellent article – unfortunately, as in the past, I’m able to login and connect to the ZFS dataset in FreeNAS and recognized by Time Machine. Time Machine will begin a countdown till backup, when the backup start, I get the following Backup Failed error…
“Time Machine couldn’t complete the backup to “freenas server”.
The network backup disk could not be accessed because there was a problem with the network username or password. You may need to re-select the backup disk and enter the correct username and password”
As I said, I am able to complete the initial login when prompted, so I’m confident the username/password is correct. FreeNAS is showing an immediate AFP logout after login and a small read/write stat. What I think is occurring is that the initial login credentials are not being saved, when Time Machine attempts the initial backup, there’s no attempt at login.
This was the very same issue I ran into post-Mavericks update. Help appreciated, if you have the time, otherwise, thank for your contributions to the FreeNAS community.
OSX: 10.9.4
FreeNAS: 9.2.1.5-RELEASE-x64
-Matt
This problem is affecting me as well on FreeNAS 9.2.1.6, and is being tracked in a couple of places:
FreeNAS bug tracking: https://bugs.freenas.org/issues/4808
Netatalk bug tracking: http://sourceforge.net/p/netatalk/bugs/573/
Brilliant article, thanks! I've followed your guide and it works perfectly for backing up two macs under 9.2.7.
Can I ask a beginners question though about size limits. Without a limit, and running out of room, will this completely fill my home server over time?
Thanks for this guide. I’m new to XFS and FreeNAS (and BSD) and this cleared up a couple points of confusion. Our 6x3TB FreeNAS machine is now humming along nicely serving several Macs. I’m amazed at how much can be thrown at it without slowing down or causing it to become unresponsive.
Thanks for writing such an excellent guide! These instructions worked great with my new Mac Book Pro running Yosemite and my FreeNAS box on version 9.2.1.3.
I went ahead and turned on the power nap feature so I can now back up my mac while it’s in standby mode.
I’m glad it was helpful for you!!!
Thank you, thank you, thank you!!! Posts like this one are what make the internet worthwhile.
Having recently build my NAS box (first build ever!) and downloaded and installed FreeNAS, I thought that the next steps would be easier. I fought through many video’s on youtube and other posts to get time machine working (to properly see my NAS drive), and when I was almost ready to throw in the towel I landed upon your guide. Amazing! is all I can say, it worked perfectly the first time. Thanks for taking the time and posting!
I’m so glad it was helpful!!!
Thank you so much for this guide! Just got FreeNAS setup yesterday and while I’ve been very happy with it so far I’ve been pulling my hair out of permissions issues with AFP. Followed this guide step by step and had it working perfectly. Perfect example of what a how-to guide should be, thanks again.
In FreeNAS 9.3 on Change Permissions/Type of ACL you can now check for (x) Mac, which is pretty nice. Thats basically all. Great tutorial! Thank you! FreeNAS is great!
Absolutly awesome, thank you so much for taking the time to post this – very useful – worked perfectly!
Thanks Kevin for your helpful article!
I have been using FreeNas for some years now in a mac-only environment and have achieved a per/user quota by doing the following.
All datasets are own by a master group and root with 777 file permissions. Each group has root has a member. I name the master group according to the top-level parent dataset (i.e. a dataset named TimeMachine would have a master group of TimeMachine and a user of root). Inside the top-level TimeMachine dataset, I add child dataset named according to the User i.e. I’d make a dataset for the user Kevin thusly, TimeMachine->Kevin. This dataset would also have the file permissions of 777 and would be owned by root:Kevin (remember that group Kevin would have members Kevin and root). I would then set a quota for each dataset i.e. Kevin would have a quote of 300g and TimeMachine would have reserved space of say 1000g.
What of permissions?
I’ve found that keeping permissions of 777 on the zfs datasets and controlling access AFP shares to provide the most flexibility in a mac-only environment. In the above scenario I would create and AFP share Named Kevin Time Machine with the allow list and read-write access list set to @Kevin. Default File and Directory permissions would also be set to 777 in the AFP share and default umask set blanked out to NULL (I’ve had some weird things happen when leaving it as 000).
This setup is highly flexible for changing needs (like adding btsync support, temporarily allowing access to a TimeMachine share etc). If I had need to access the Kevin share as an admin to migrate the user’s data, I need only add @TimeMachine to the allow list and it’s all sorted. Also, if i Create a share for the parent dataset of "TimeMachine", I can view and make changes to the children datasets without permission errors.
If anyone is interested, I can share my setup of btsync and other datasets?
Keep getting a problem in which i will get the OSstatus 2 error. Please Help!!!
I just found the following at http://www.defaults-write.com/setup-a-size-limit-for-time-machine-backup-volumes/#.VSWoa1zfikg
<quote>
Time Machine will standard use all the available disk space on an external drive or a external server volume. You can setup a limit how much disk space Time Machine may use. Use this defaults write Terminal command:
defaults write /Library/Preferences/com.apple.TimeMachine MaxSize 405600
Where MaxSize 405600 is the MB equivalent of 400GB (400 * 1024)
To remove the limit:
defaults delete /Library/Preferences/com.apple.TimeMachine MaxSize
</quote>
If I set up a share on my server with a specific ‘size available’ will it still go over that limit?
Thanks!
Hİ
is this available version 7?