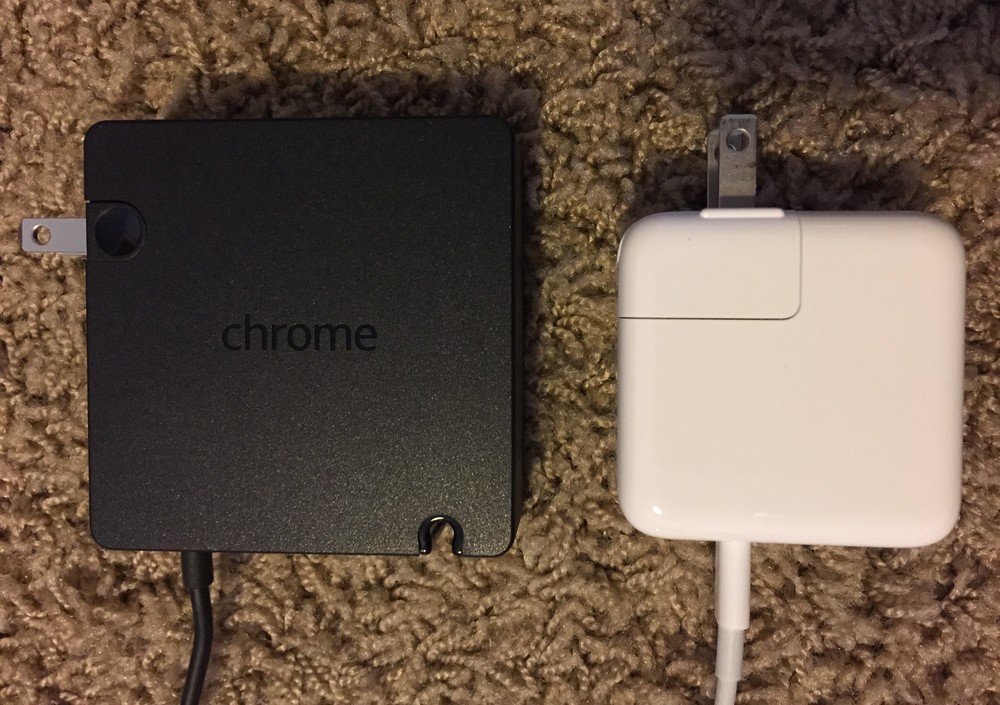
With the release of Apple’s newest MacBook and Google’s newest Chromebook Pixel, it seems like the computer industry is beginning to standardize as USB Type-C (USB-C) as a single port for charging, transferring data, and DisplayPort. Apple is ditching the proprietary MagSafe connector in lieu of an industry standard. Read more →
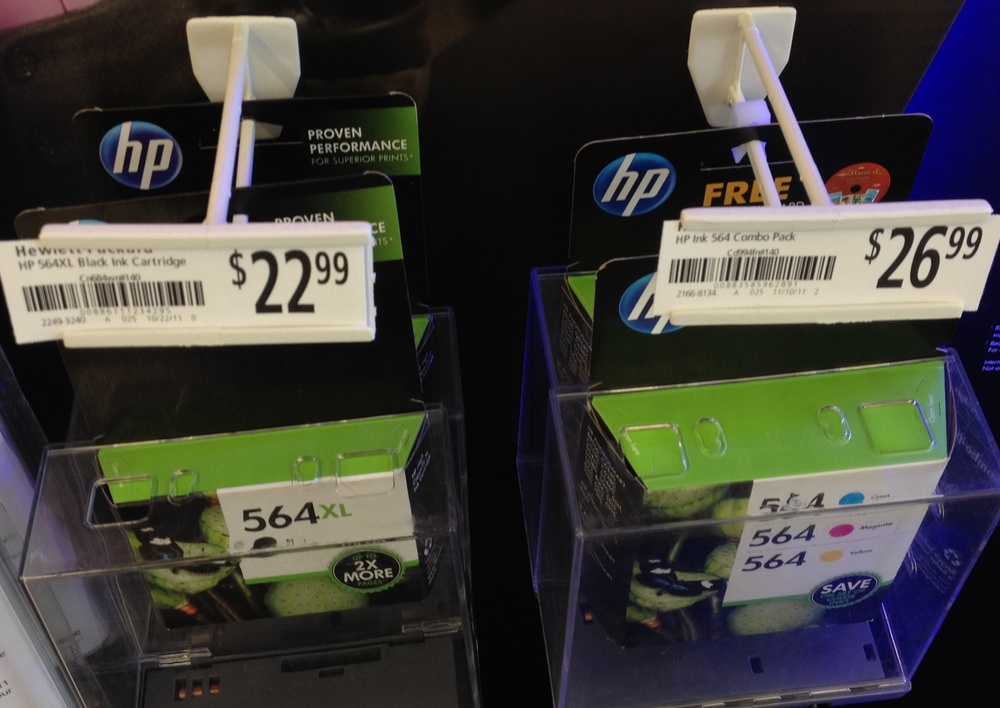
We all hate having to buy new ink cartridges for our inkjet printers. The darn things seem to run out of ink all the time, and it’s tough to buy one color at a time. They’re incredibly expensive as well. Is there any way out of the “razor and razor blade” model? Continuous ink systems can theoretically provide a solution. What if, instead of having a bunch of small ink cartridges, you had external tanks of ink that had more ink than you’d ever need with hoses going to the print-head? That’s exactly a continuous ink system is. I decided to give the kit from Inkproducts.com a go!
I have always been infatuated with the idea of continuous ink systems, but it wasn’t until we had to print wedding invitations a few years ago that we felt really needed one. We could either pay a printer a per-invitation fee or we could use our own printer. I justified the cost of a continuous ink system, $129.99 at the time of purchase, by comparing it against the hundreds of dollars we would have to pay a professional printer. Furthermore, not only was the CIS cheaper, but we also got to keep the system once we were done printing invitations.
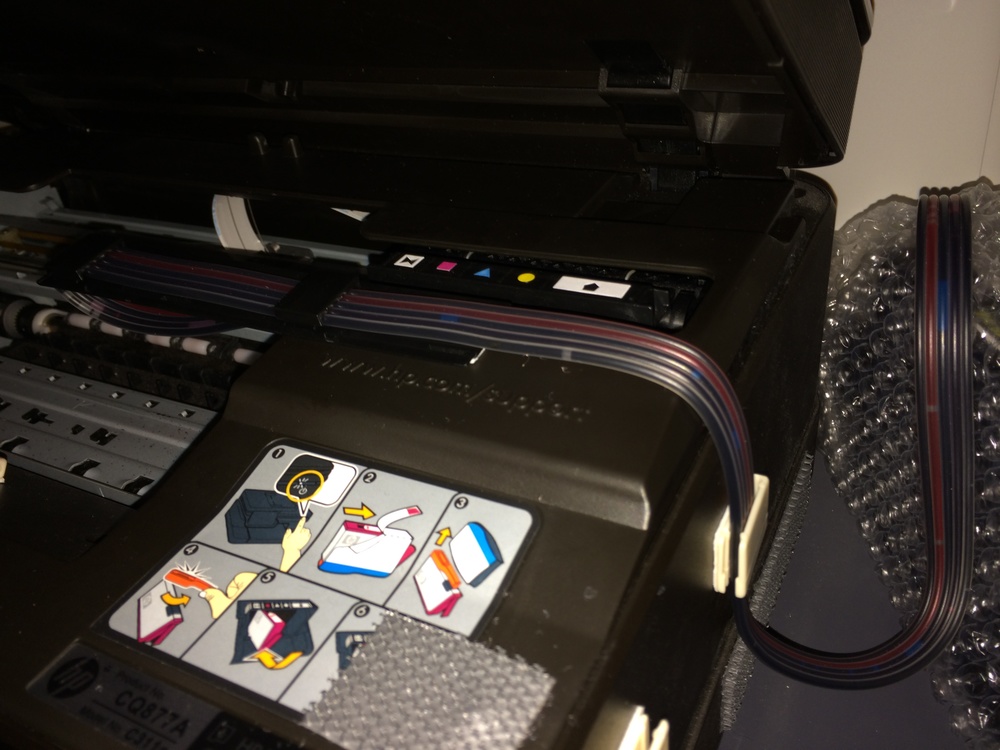
Anyhow, that was years ago, and the system worked well, but eventually it ran out of ink, and rather than refill it, I saw that Inkproducts.com had a new version out so I decided to spring for it. Step one in installing a custom ink system is to remove the old cartridges.
Old Ink Cartridges
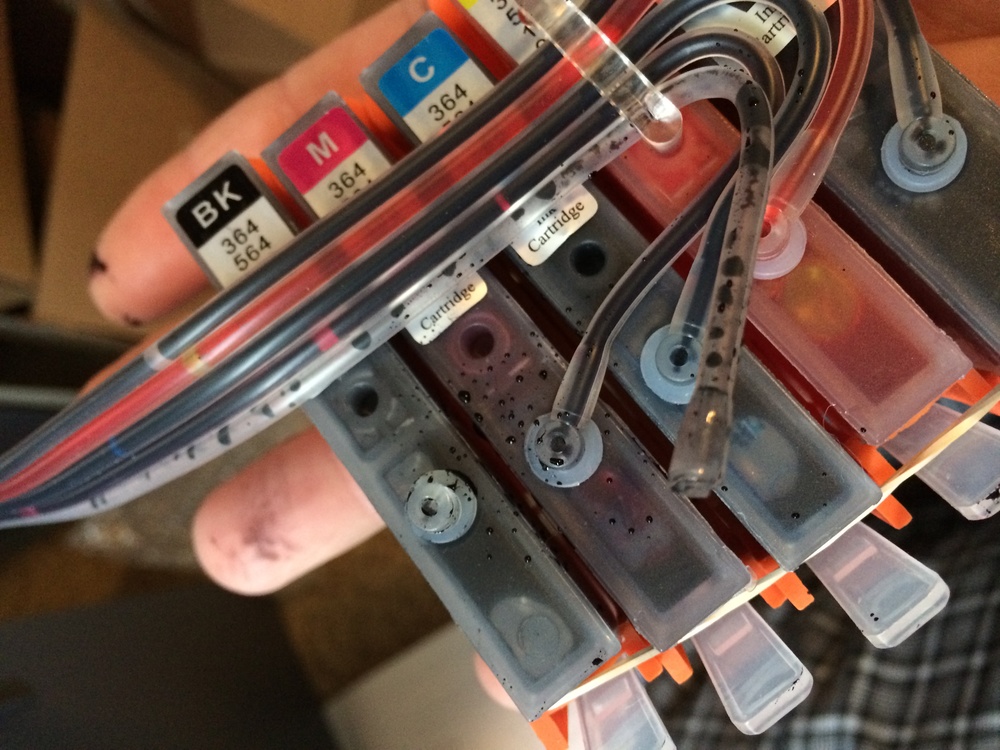
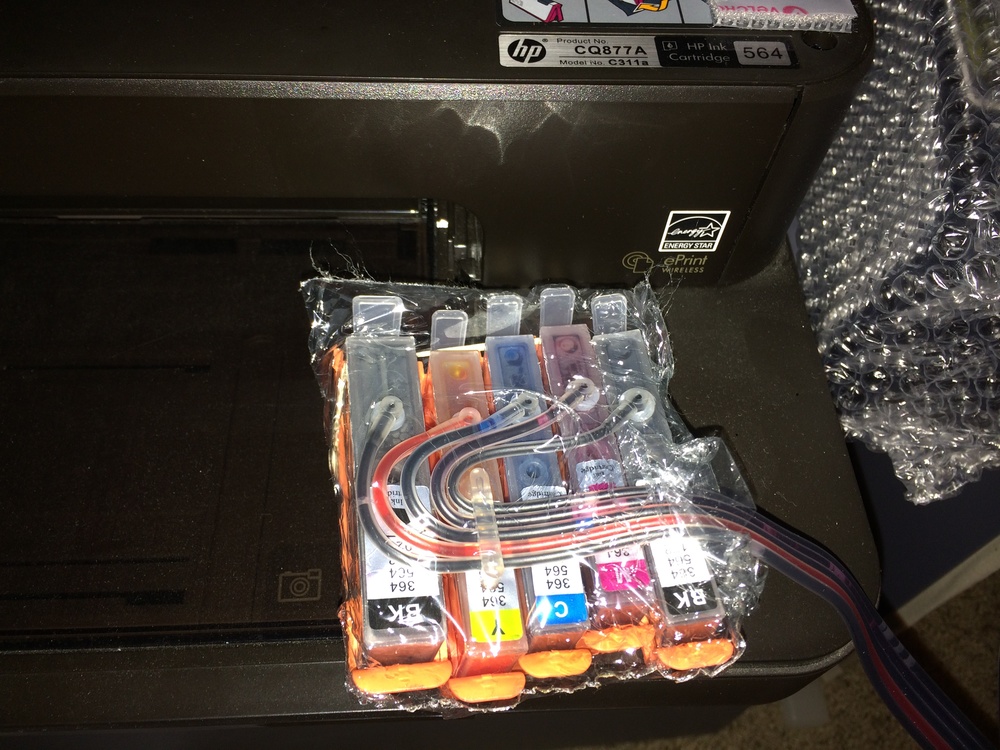
That’s where I hit my first snag… I pulled out the block of replacement ink cartridges I was supposed to install, and my hands got full of ink.
Uh oh…
Can you see the detached hose on the left? Bummmmmer… I received a defective unit. I contacted Inkproducts.com. They asked me to send a picture, and as soon as they got the picture, they sent me a brand new unit with a pre-paid label to return the defective unit. That’s pretty solid customer service right there.
My Replacement Unit
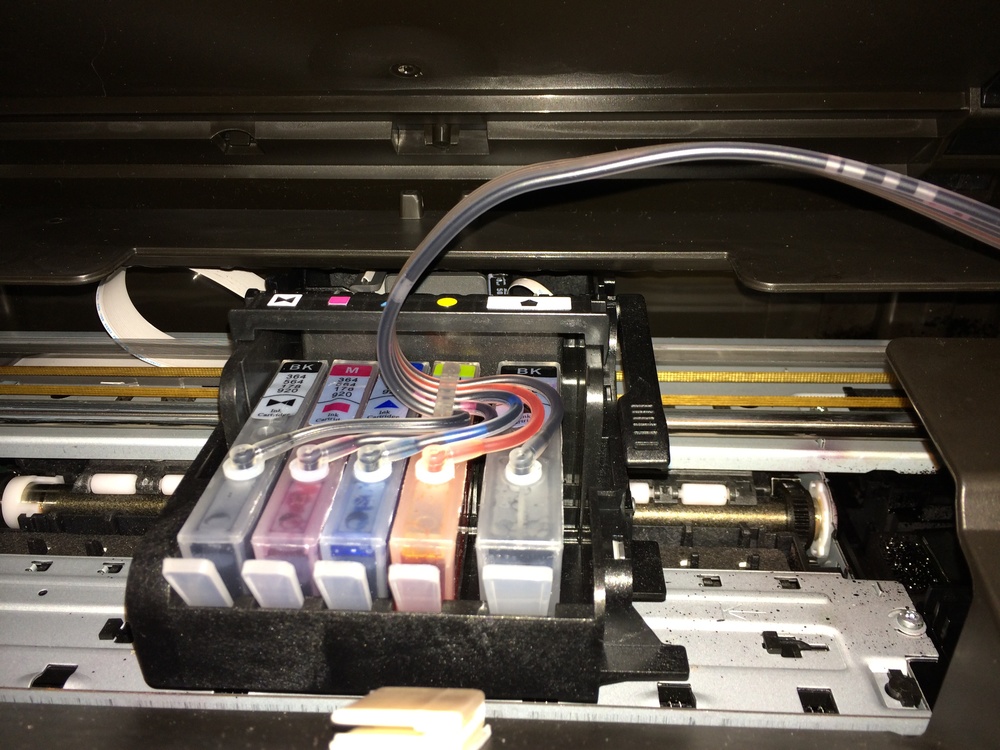
I received my replacement unit promptly, and after a quick visual inspection, the new cartridge unit looked good to go. I installed it into my printer, which is only slightly more complicated than installing a standard set of ink cartridges. As these units are all attached to the same ribbon of hoses. You place them all in the slots in a group, and then you snap them all in individually.
Locked and Loaded
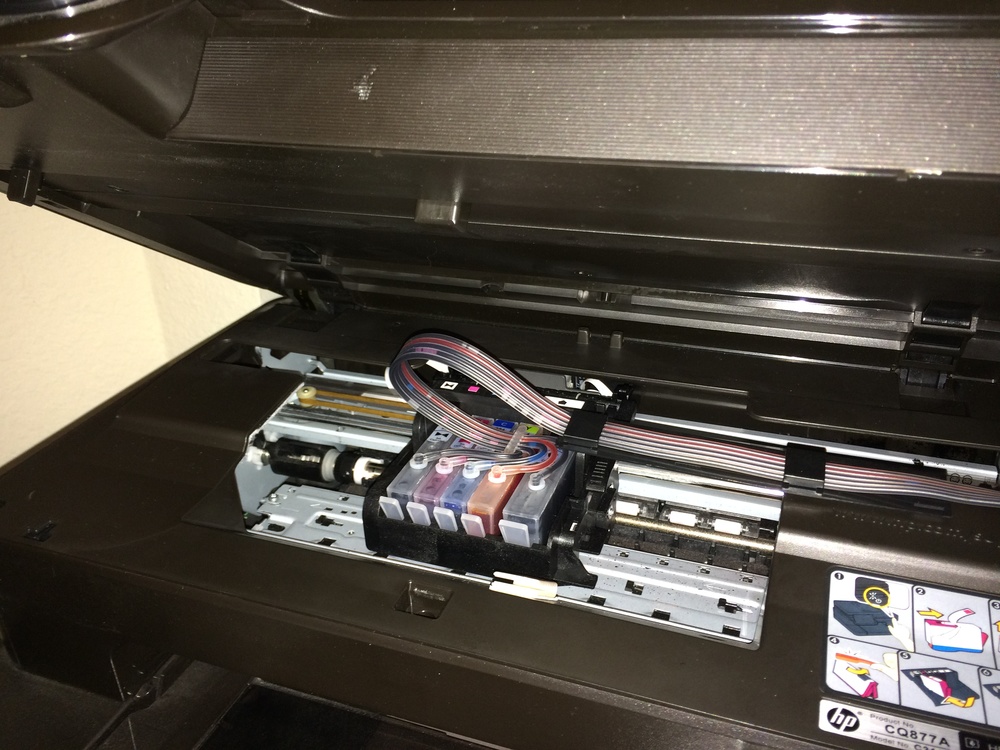
After they’re installed properly, some other pieces are included to guide the hose so there it doesn’t get caught on anything as the print head moves back and forth.
Then there’s the external tank. This kit includes a set of plastic hooks with double sided tape so you can fasten it to the side of the printer. This is a great solution as it keeps the tank secure to the side of the printer, but it’s easy enough to pop it off if you need to move it around to refill the cartridges or do some other maintenance.
Once installed, it was time to give it a go! I followed the instructions to run a print head cleaning and printed out a few test pages. I got an “error” on my printer that Non-HP cartridges were installed. Right… Like I care…
So… how did it work? It worked great at first, but after some time, I noticed that the colors were fading and eventually it seemed that the ink was so faint that it barely showed up. I was frustrated, and I sent a note to the company. They told me to give them a call during business hours. I spoke with a really helpful person who showed me exactly what to check, and in the end, we found the issue, and it was MY fault.
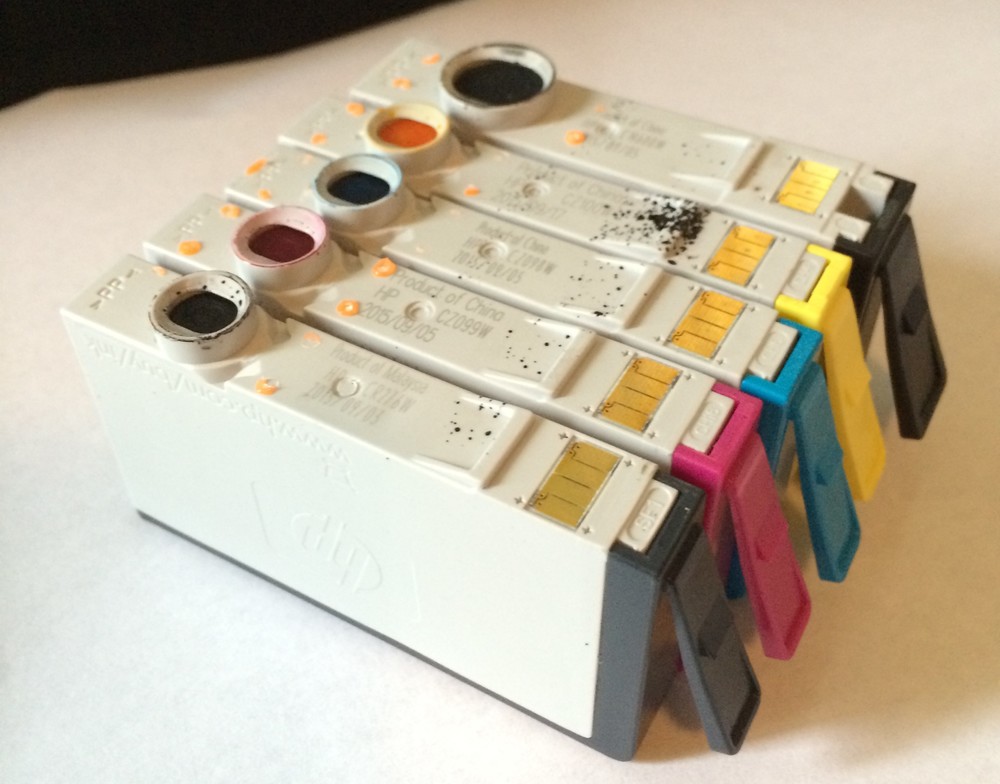
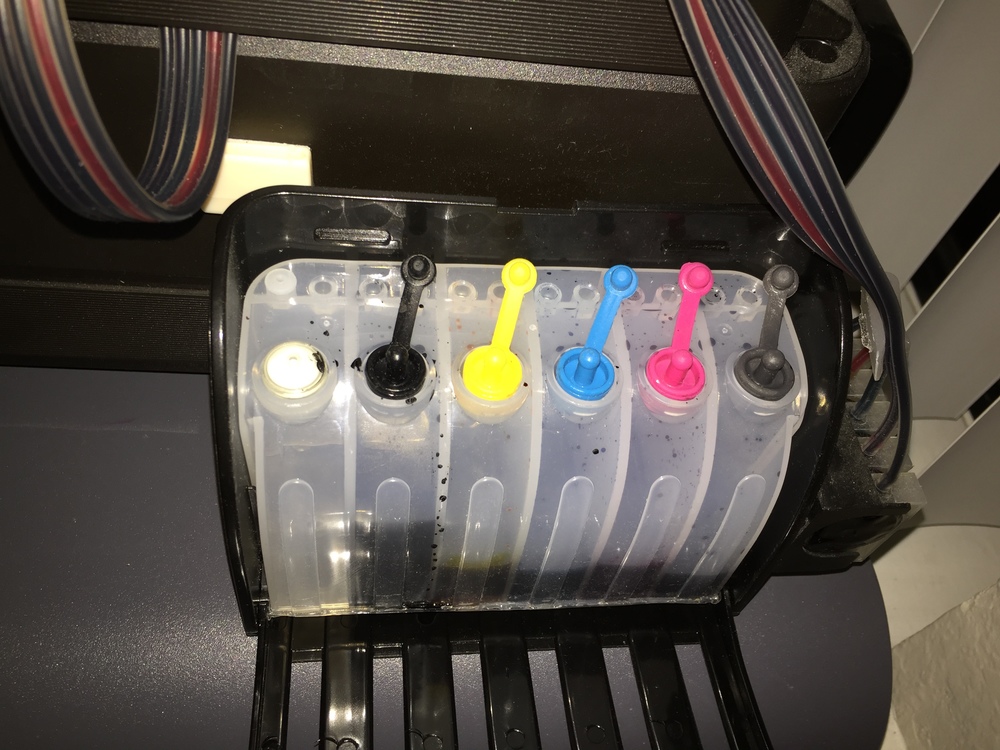
In this picture, the vents are properly opened.
There are some air vents on the top of each ink cartridge, and you need to unplug the stopper at the top of each tank. If you don’t, the airflow will be blocked. If the airflow is blocked, picture someone holding their thumb over a straw and pulling it out of a soft drink. The water stays in the straw, just as my ink was staying in the hoses. As soon as we unplugged the vents, it worked great! Instantly, my pictures were again vibrant.
Over the past few years, I’ve printed countless shipping labels, photos, and other various documents. The printer works like a champion, and it’s so nice to not have to worry about filling up the cartridges. After a few years of lots of printing, including both my wedding and my brother’s wedding invitations, I’m finally now needing to refill the tanks. I ordered a black ink refill kit, and as you can see in that pic above, I should probably get the color refill kit as well.
I’m really happy with my purchase from Inkproducts.com. One piece of feedback would be to make the instructions slightly more clear. Little things like changing the bullet points to numbers and adding check-boxes so people can check off steps as they go could go a long way.
I found the instructions to be a bit difficult to follow.
Do you need to be an engineer to install this? No… not completely… However, I do think the kit is a bit too advanced for a completely non-technical person. If you have a need for this, get your family geek to install it for you.
If you go through a lot of ink cartridges, I recommend picking up a CIS. Not only is it satisfying and convenient to never have to think about ink, it’s also a greener solution. You’re not constantly buying disposable ink cartridges. There are some CIS systems at different places on the internet like Amazon, etc, but I like Inkproducts.com, as they have shown good customer service over the years and a willing to help their customers.
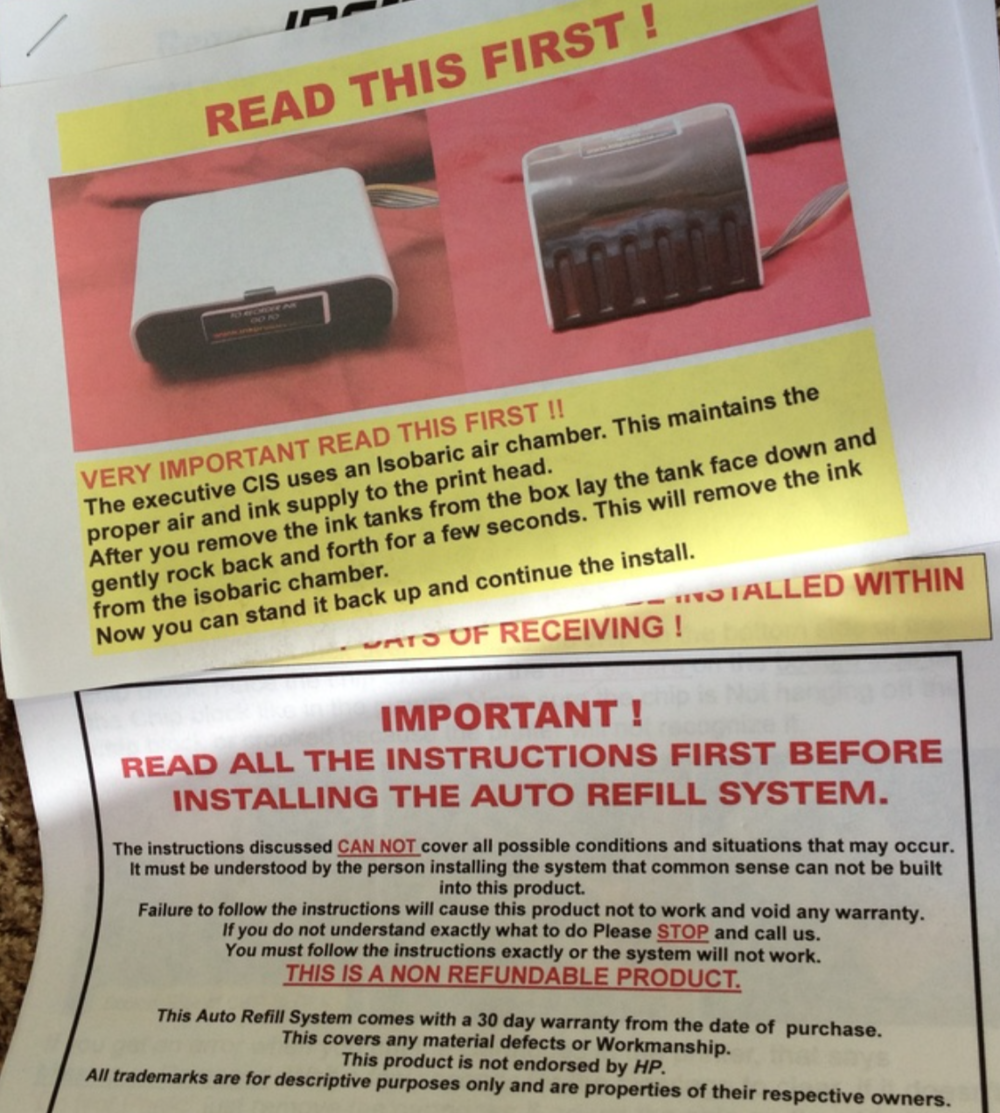
The package from InkProducts comes in a pretty boring brown box, and inside, you’ll find the continuous ink system and a manual.
First thing’s first… There is a bit of installation required for this kit! You may be surprised by what needs to be done to get this fully installed and working properly. The manual is definitely necessary. To be honest, I feel like the manual should be a little bit better. I was able to get things figured out easily. But if I were not a techy already, I think I would have a really difficult time. For example, one of the more difficult things that needs to be done with this installation is the removal of microchips off of the authentic HP ink cartridges and putting these chips into a plastic retainer that Ink Products calls the “chip block.” This is actually a pretty ingenious idea. This keeps the printer from telling you that your ink is not authentic. However, the process to do this is a bit complex. You have to use a razorblade (I used a safety pin) to pry these flexible microchips off the ink cartridges. They just referred to these as “chips” and called the place where I was supposed to put the chips the “chip block.” I just think the manual could better describe things, telling people EXACTLY what the “chip block” is, why they need to remove these chips, and how to do it.
In any case, I didn’t find installation that difficult, but if you’re not a technical person, you may find it impossible. I’m just giving fair warning.
When the most recent iPhones were released, I was conflicted, just as many others were. Should I go with the 6? Or should I go big and get the 6 Plus? As the preorder deadline loomed, I made a quick decision to order both. I would order the 6 Plus through T-Mobile with their Equipment Installment program. I would order the regular sized device through Apple. I checked both return policies, and I was comfortable with them.
My T-Mobile Pre-Paid Return Label
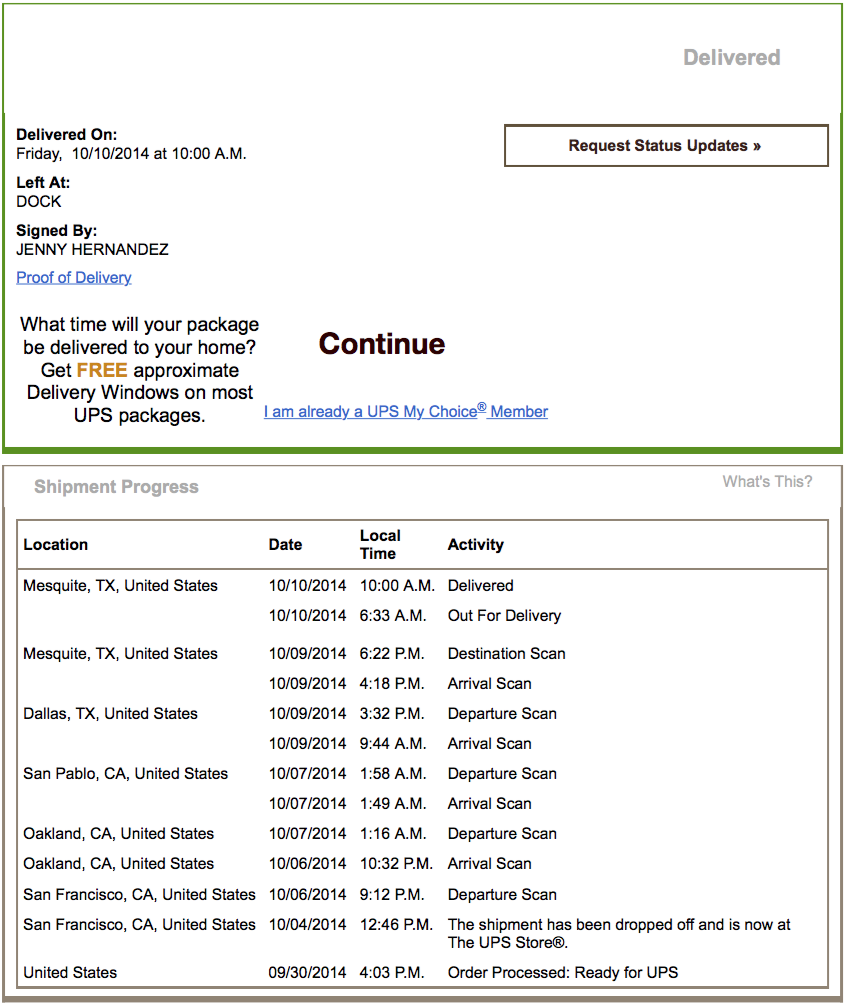
The purchase strategy worked just fine. I got both devices. I played with them both, and I decided that the 6 Plus was a bit too big for me. I read the return policy for T-Mobile, and I called them up to get a return label printed. There was no issue, and I dropped off the item for shipment at a UPS Store on October 4, 2014.
I waited a few days, expecting my refund to post soon. After a week or so, I called T-Mobile.
I spoke to a friendly woman on the phone, and she advised me to read the return policy more closely. It turns out that it takes two billing cycles before a refund can be processed to an account. I checked the return policy. You have to do a lot of digging, but eventually you can find this:
Yup. The policy says it takes two billing cycles. That’s a bit crazy to me. Can you imagine returning a product to Best Buy and then having them tell you that in 60 days you will get a refund? The even more annoying part about this is that T-Mobile charges you a monthly Equipment Installment Plan (EIP) fee for you to pay off your device. Even though I have returned the item, when my bill comes, I still need to pay the fee until they recognize the refund. Once the refund is issued, the EIP payments get credited back.
While I was annoyed, rules are rules. I should have read more carefully. After two billing cycles passed, I still didn’t have my refund, and when I logged into my account on the T-Mobile website, there was no mention that the phone had been received, even though I still had all of the tracking information that showed the phone had been delivered.
As you can see, the item was signed for and delivered.
On December 16, 2014, over two months after I returned the device, I called T-Mobile to check the status of the refund. I spoke with a gentleman who was quite friendly, and he began to research my issue. He said he thought he had figured things out and that I should be hearing from T-Mobile within 72 hours. PROGRESS!
72 hours passed. I heard nothing. I let the holidays pass, and I called again on December 29, 2014. When I called, I spoke with a man named Darion, and he was pretty friendly as well. He indicated that “we were going to get this resolved,” and then he asked me to just wait a moment. All of a sudden, someone else picked up. I was transferred to a new person. The new person may have been from a different department, and the new employee had no idea what my call was about.
Time to start over. I expressed to Belinda how displeased I was with the service. I told her I didn’t want to pay the restocking fee, as I didn’t believe that T-Mobile was following their own policy by delaying the refund for so long. She spent a long time looking through my account, and it seemed like she really had no idea how to get my refund. I could tell she wanted to help, but she wasn’t getting too far. She finally came back and said that she saw that a few days earlier, a “handset research form” had been submitted. Apparently this is the form that makes someone go look for the device you returned. I wasn’t confident they would be able to find a small iPhone box months after they had received it. I gave her my tracking number again, letting her know that the phone was signed for and received by T-Mobile. She said she was going to submit a fresh form. After 33 minutes on the phone, she gave me a reference number. She said I would hear something with in 72 hours.
72 hours passed. Nothing.
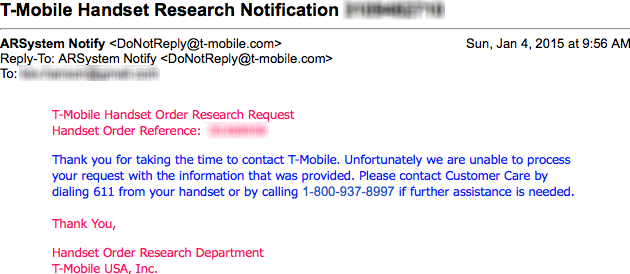
Then on January 4, 2015, I got an e-mail from T-Mobile. Was this going to be the end of all my pain, in one beautiful confirmation e-mail?? Opening the e-mail yielded a surprise:
“Thank you for taking the time to contact T-Mobile. Unfortunately we are unable to process your request with the information that was provided. Please contact Customer Care by dialing 611 from your handset or by calling 1-800-937-8997 if further assistance is needed.”
ARE YOU KIDDING ME!?
I called back later that day. I spoke with a gentleman named Trent. Again, Trent was quite friendly, and he felt really bad about the situation. He kept telling me that he was going to “take care of me.” I told him I wanted to speak to a supervisor, and he told me one would reach out to me within 24 hours. Nevertheless, he appeared to be making some type of progress, finishing the call by saying, “You have a wonderful night. We’ll get this taken care of. The back office should start the refund process tomorrow.” Really? Finally?
24 hours passed. No supervisor reached out to me. Then… I got two consecutive e-mails!
Oh sweet Jesus! Here it comes! I waited 48 hours for my EIP charges to credit, but when I logged into my T-Mobile account, it still showed the full amount.
On January 8, I called up T-Mobile again. I spoke to a friendly woman, and she told me that she saw that things had been returned so she had to put in a supervisor’s note to get the charges adjusted. She told me that in a couple days things would be reflected.
On January 10, my bill still looked the same. I called up T-Mobile, and I spoke to a woman who told me I had a pending credit, that I needed to pay my bill in full now, but that on my NEXT billing cycle, the credits would hit, and all would be well. It turns out, she was right.
In the end, I got my refund. It took me FOUR MONTHS. Am I an outlier? It doesn’t appear that way. As a Reddit geek, I browse the T-Mobile section at least once a week. How about these gems?
I’m not alone. T-Mobile is supposed to be the consumer-friendly uncarrier. How can a multi-month return process be consumer friendly? If there were a sound logistical reason, I would understand. But on the flipside, I think this drawn out return policy adds a lot of risk. They should issue a refund as soon as they receive a device and confirm that it is in good working order. By waiting so long, you get situations like mine or like the ones I linked to where phones can’t be found and handset research forms need to be submitted. T-Mobile, fix your business processes for the mutual benefit of your company and your customers!
The 2007 iMac is really a funny machine. On the one hand, it’s a relic. It’s nearly 7 years old, and in computer time, that’s an eternity. So many things have changed since 2007. Yet, at the same time, it has a 2.4ghz Core 2 Duo, which is dual core and 64 bit, plenty powerful for most tasks. It also has a beautiful 20” monitor. The disk situation is a different story. The default model came with a 500GB sata drive, and the DVD superdrive is actually connected via PATA.
When my dad told me that the iMac was running slowly and needed a tune-up of sorts, my initial instinct was, “Dad, this thing is 7 years old. Let’s get you a new one.” However, when I played around with it, I found slow shutdown, slow bootup, slow opening of programs. This told me that the disk was the weakest link in the machine. I told my dad that I would try to replace it with an SSD to see how that would work. I told him that if it worked, it probably would breathe another couple years of life into the computer, and if it didn’t, I could eBay my recent purchase and he wouldn’t be out much cash for the attempt.
I got a great deal on the 480GB Crucial M500 SSD. I also ordered a bracket that would be used to mount the 2.5” SSD in the place of a standard 3.5” hard drive.
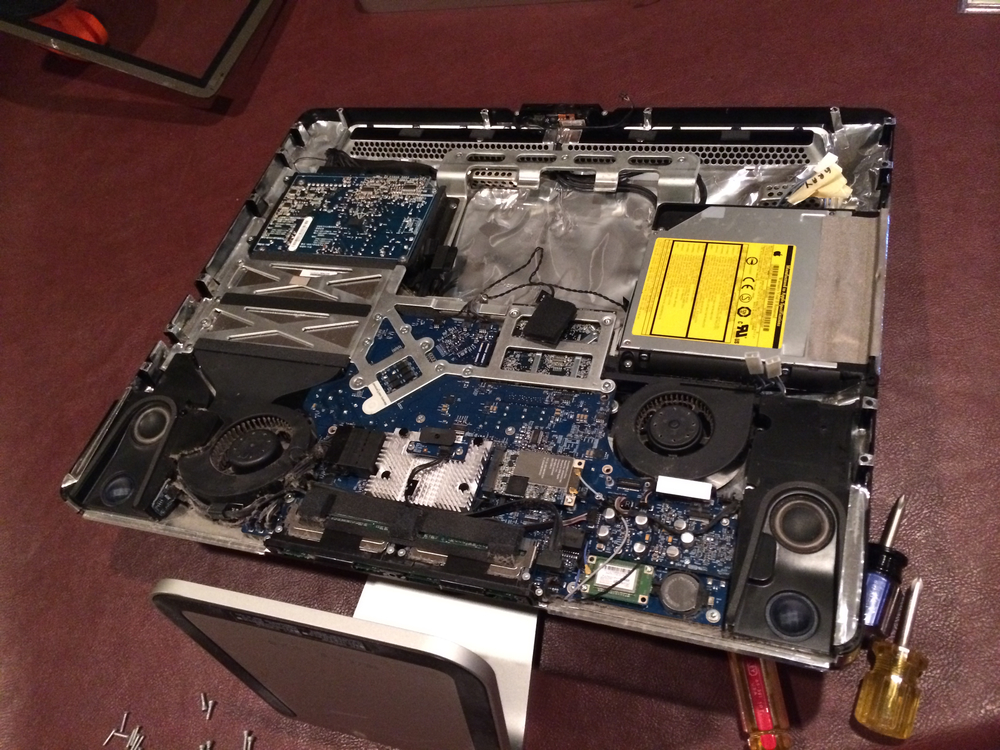
Screenless iMac
If you have ever taken apart an iMac, you know that it is a bit daunting. Unlike unscrewing a standard computer case, you have to use a suction cup to ply the screen off. Once you ply the screen off, you then use a torx screwedriver to get the rest of the thing apart. It can be quite stressful if you haven’t taken apart a bunch of electronics before. I finally got the thing pulled apart, though, and then I was able to remove the hard drive.
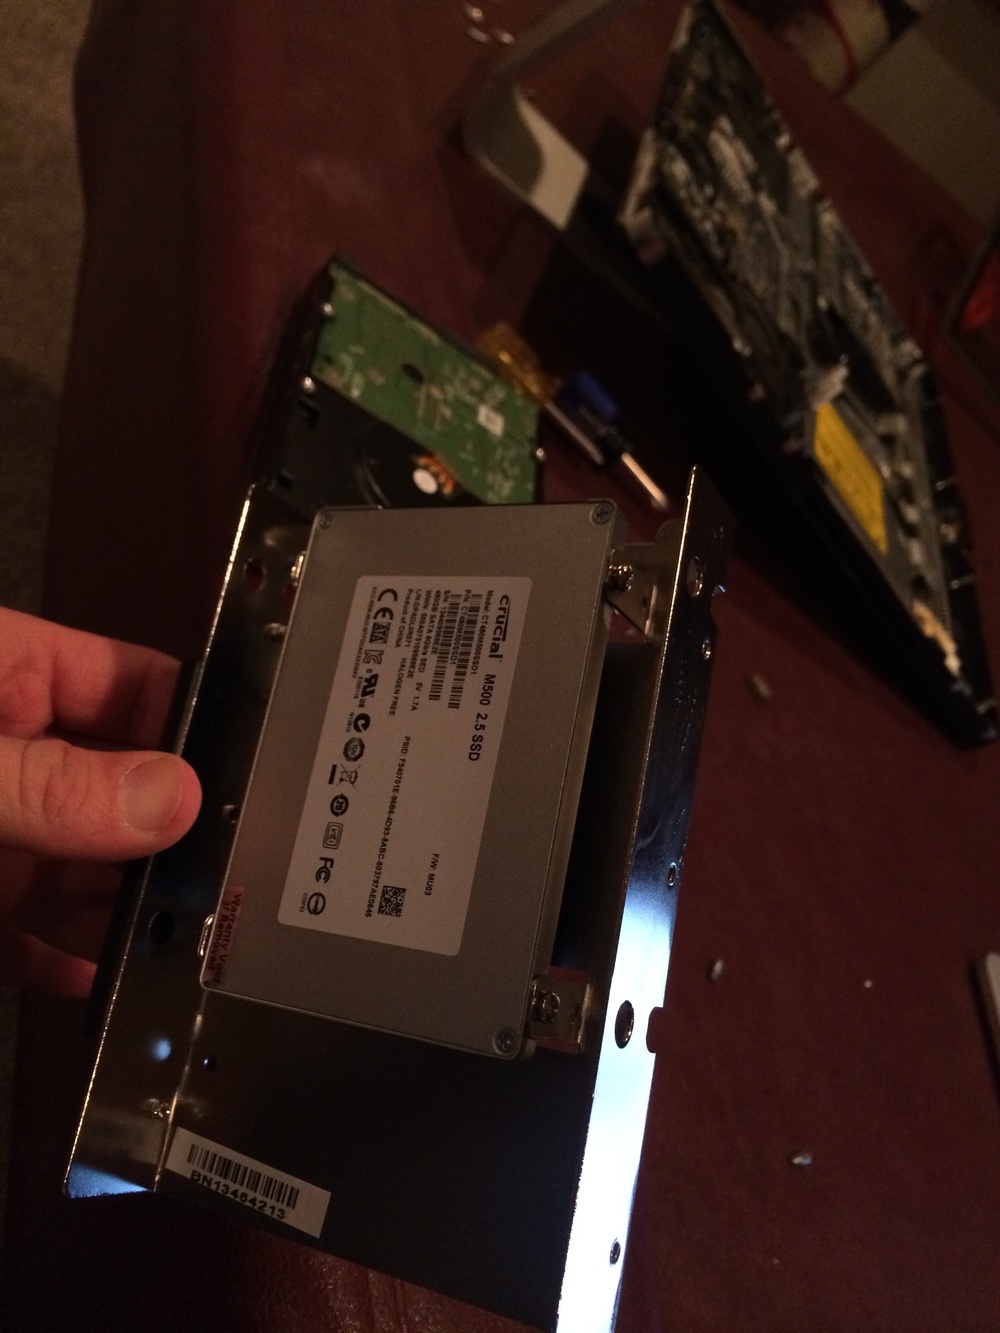
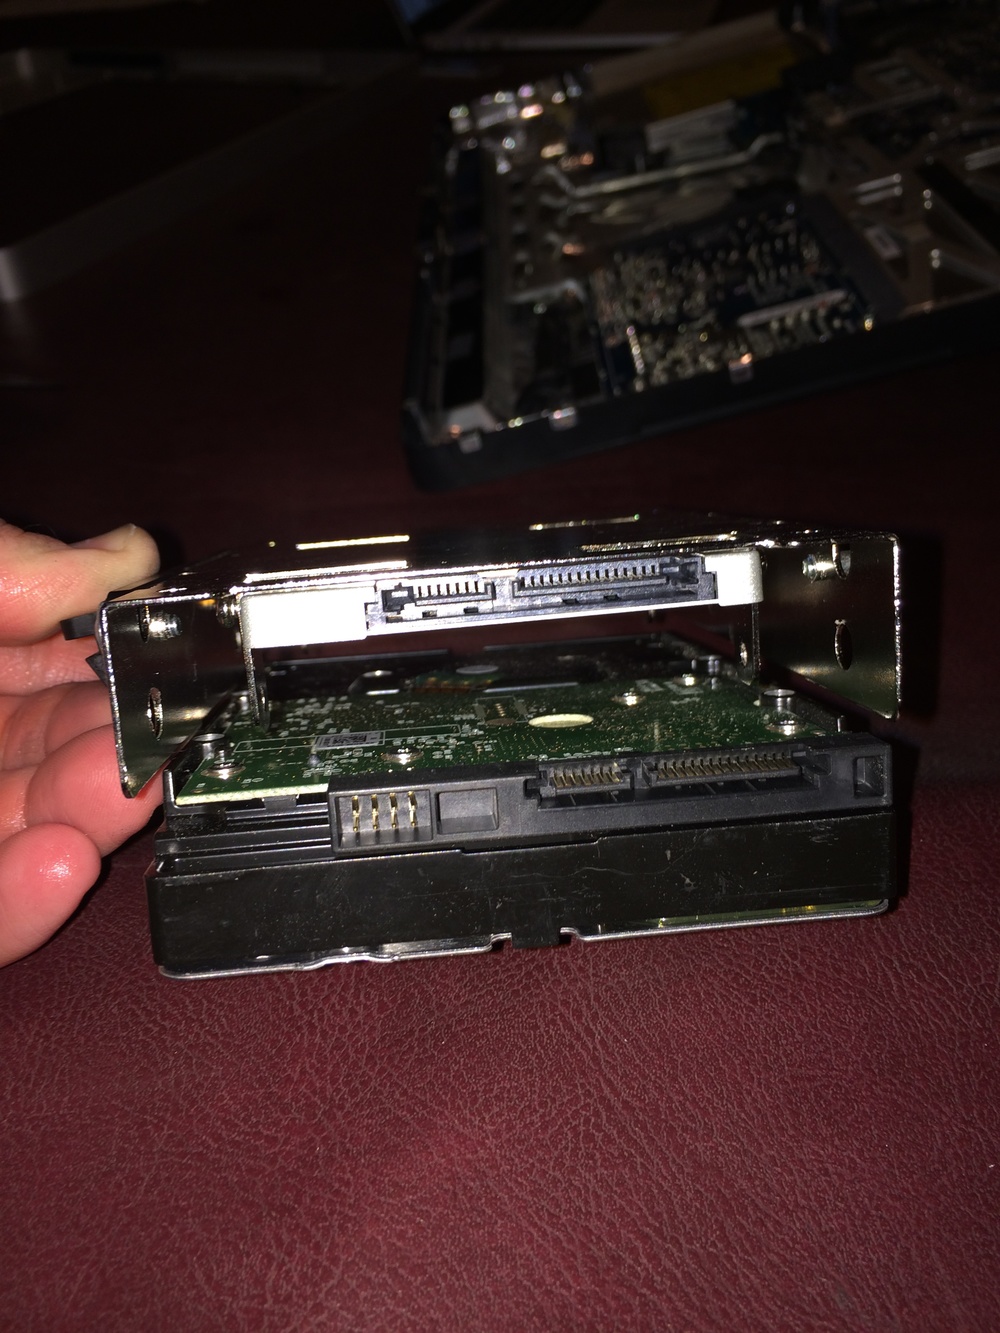
The good news was that the 2.5” drive fit inside of the 3.5” bracket perfectly, making it an easy replacement mount.
ssd-1ssd-2
There was one piece of bad news… Take a look at the above picture. While it may appear to be a perfect match, it turns out that the SATA cable in the iMac extends JUST far enough to plug in a standard hard drive, which has the connector lined up completely on the right. My bracket places the SSD right in the center, which moves the connector over a half an inch or so. After trying to stretch the cable carefully to new avail, I resorted to another solution.
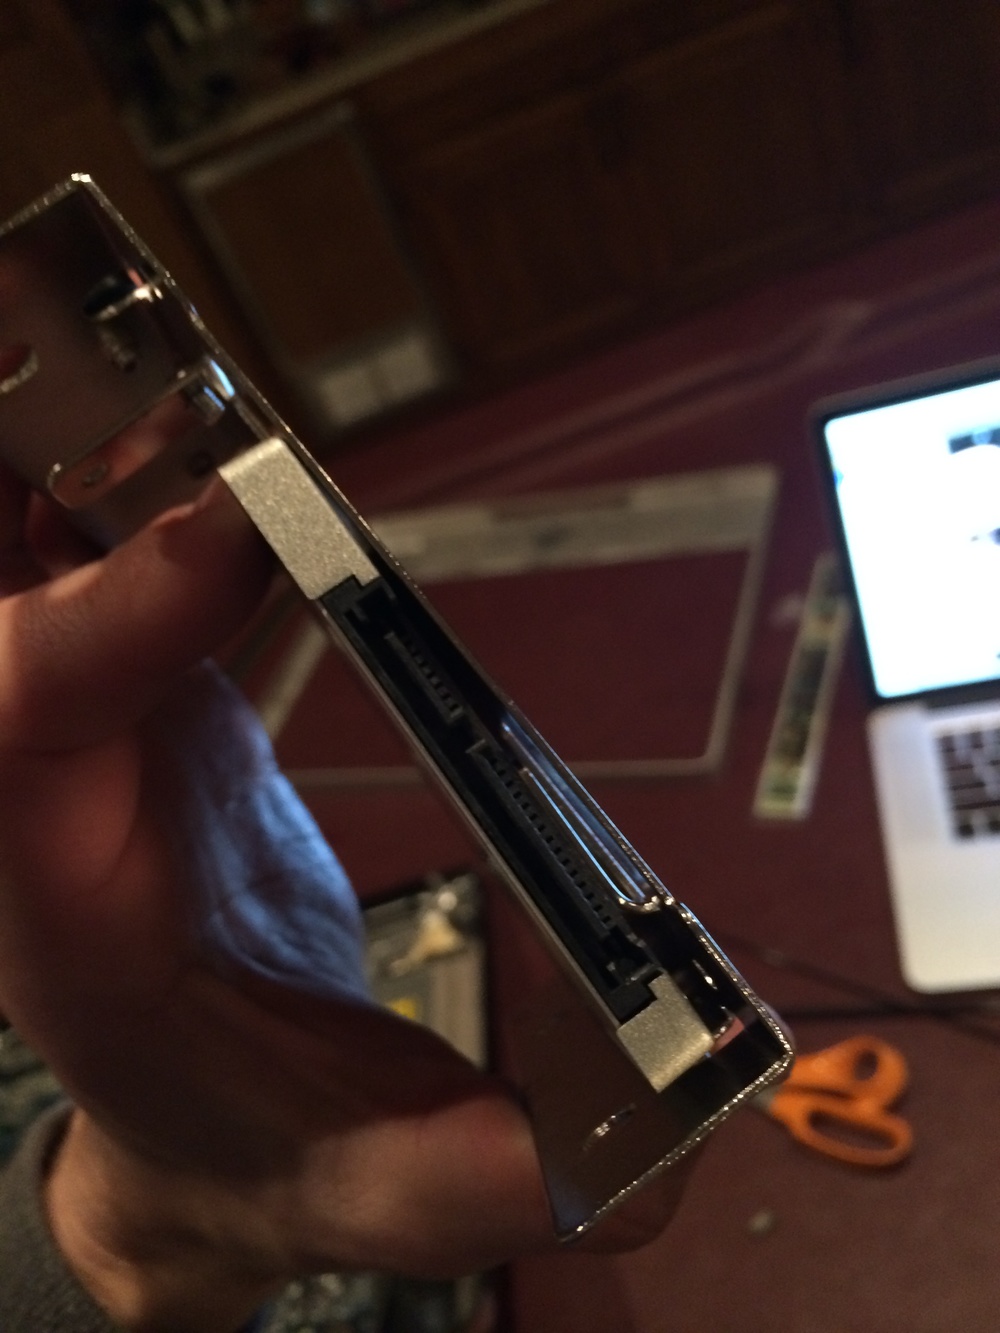
ssd-fixed
I bent one of the pieces of metal that holds the SSD to the bracket and slid the SSD all the way to the right of the bracket. From there, I used the world’s most convenient adhesive, duct tape, to make sure that the SSD was completely secured to the bracket. It worked! As I started rebuilding the machine, though, I couldn’t help think that Steve Jobs wouldn’t exactly have been proud of my solution, as a man who always insisted that the components on the inside be just as beautiful as those on the outside.
Every time I take apart an iMac, I’m always a bit nervous the first time I try to turn it on after reassembling it. I had it all put back together, I pressed the power button, and boom – I got that nice Mac ding, and from there, I used an external drive adaptor to copy the contents of the existing drive to the new SSD.
Once the transfer was done, it felt like a brand new computer. Everything was ultra snappy. Being 7 years old, it of course doesn’t have the most powerful GPU in there so you wouldn’t have to do too much graphically to bring this computer to its knees, but for my parents’ iPhoto / web browsing needs, this machine is perfect. It still runs OS X Mavericks, and thus, it’s not really limited in any way.
In fact, I still have one last upgrade left for this Mac. While it only officially supports 4GB of RAM, it can actually capacitate 6GB. I’ll soon order a 4GB module from OWC, and the machine will get a 50% boost in RAM.
This upgrade experience made me realize what great value there is left in these older iMacs. You can pick them up pretty cheap on eBay, and if you don’t mind swapping out the hard disk for an SSD and upgrading the RAM, you can have a VERY fast family web browsing machine on the cheap. Consider that Apple STILL sells machines with only 4GB of RAM. My hope is that this machine will actually be able to run the NEXT version of OS X, Syrah, as well. I feel like the only reason it wouldn’t be able to is if Apple were to put a GPU requirement on the new version, as the rest of the specs stack up decently with modern computers that Apple sells.
FreeNAS is awesome. Also, FreeNAS is hard… I recently switched from a Synology device, and while I am already appreciating the increase in functionality and power, it’s certainly not as easy to do some basic tasks. One of those tasks is setting up a Time Machine share where all of my household Macs can back up. Between reading the tutorials and giving some trial and error myself, I think I have come up with a good solution.
And before I get started with the step by step guide, let me reiterate one thing: Permissions, Permissions, Permissions! If you ever find yourself banging your head against a wall because something in FreeNAS isn’t working as you expect it to, the likely culprit is permissions. Once you wrap your brain around them, though, things become more simple. Hopefully this guide helps put a foundation around that.
I had been thinking about getting a network attached storage system for years. Even before the Snowden controversy, I didn’t love the idea of my files being stored in a cloud like Dropbox. I also wanted to have some kind of home theater strategy with my ripped media. I pondered the options for a long time, and my final decision came down to buying a Synology device or building my own device with FreeNAS.
I chose Synology for a multitude of reasons
I like to tinker. Having a commercial product would keep me from being able to constantly open the NAS up and mess with it.
They have a suite of applications that can run on DSM.
It’s easy to set up, and Synology Hybrid RAID is auto-expanding and very cool, a la Drobo.
I’ve had my DS1513+ since it was first released, and while it has definitely done its job, there are some things that bother me about it. First of all, bugs…
There have been some major security bugs with Synology. For example, how about that time when everyone found bitcoin miners running on their boxes? Their CloudStation solution is great for sync’ing files, but there are still loads of bugs with it, especially on OS X. I have reported these bugs repeatedly, and they still don’t get fixed. For example, iWork files are treated as folders, rather than files, and the internal package contents get updated separately, causing iWork to constantly ask you to re-save the document during use. Cloud Station creates conflict files all the time, it often freezes Finder, etc. They either ignore bugs or introduce new ones with every release, it seems. It’s great that Synology has so many mobile applications, but these are buggy as well. They are supposed to keep me logged in, but I continue to have to re-login on my own. Their UIs aren’t great, and the functionality isn’t killer.
Speaking of security, all remote NAS access with Synology is being migrated to quickconnect, their solution of giving you a unique ID that lets you acccess your NAS wherever you are, without setting up port forwarding on your router. This is theoretically a great solution, but the service goes down from time to time. And furthermore, I got a NAS so I could get away from being dependent on a hosted vendor for my data. Even though all my data is on-prem with a Synology NAS, I still depend on their external service to access it via quickconnect. With the development process for DSM being closed source and them not fixing bugs I submit, I don’t really feel like I can trust their device with my data. Synology still doesn’t support volume-level encryption either. And if you do encrypt a shared folder, some features like NFS are disabled.
In terms of applications I run on my DiskStation, I really only use CloudStation for file syncing across all my devices. I tried to run Plex, but it requires transcoding to be super useful, and the CPU on the DiskStation isn’t up to the task. Thus, I built my own dedicated Plex box. I also use my DiskStation as a TIme Machine destination for all the Macs in the house, but that can be done with any NAS.
So… Why FreeNAS? FreeNAS is open source, and I can build my own box. While being open source doesn’t guarantee security, the open transparency and development process certainly makes me feel better about security. Because I can build my own box, I’ll build one that is silent and uses less power than the combination of my Plex box + Synology NAS. It’ll have more RAM and be faster. It will be fast enough to do the Plex transcoding. Furthermore, rather than depending on a black box Synology Hybrid Raid solution, I’ll be on the tried and true ZFS, which I have far more trust in. For sync’ing my files, I’ll use bittorrent sync, which is a P2P sync’ing solution. I won’t need to depend on Synology’s Quickconnect service.
Thus, it’s decided! I’m excited to have a new geek project! I’ll be buying all the parts for my new FreeNAS box, and then I’ll sell my DS1513+ and my M93P Tiny machine soon after. Watch this space… I’ll be documenting my build!
Are you familiar with Plex Media Server? If not, you should be… it’s awesome. Well, it’s awesome assuming that you either take the time to rip all of your media (me!) or you’re okay with pirating content from the internet. Once you get all of your movies, TV shows, music, pictures, etc, nicely organized, Plex Media Server is a tool to stream that content to a variety of devices, whether it’s the family TV in the house or an iPhone on the go. It has the ability to transcode media on the fly, adaptively taking a 1080p blu ray rip and streaming it at a lower resolution / bit-rate to your phone on the other side of the country. It can process multiple streams at once, assuming your hardware is capable of handling it. Plex makes clients for iOS, Mac, PC, Android, etc.
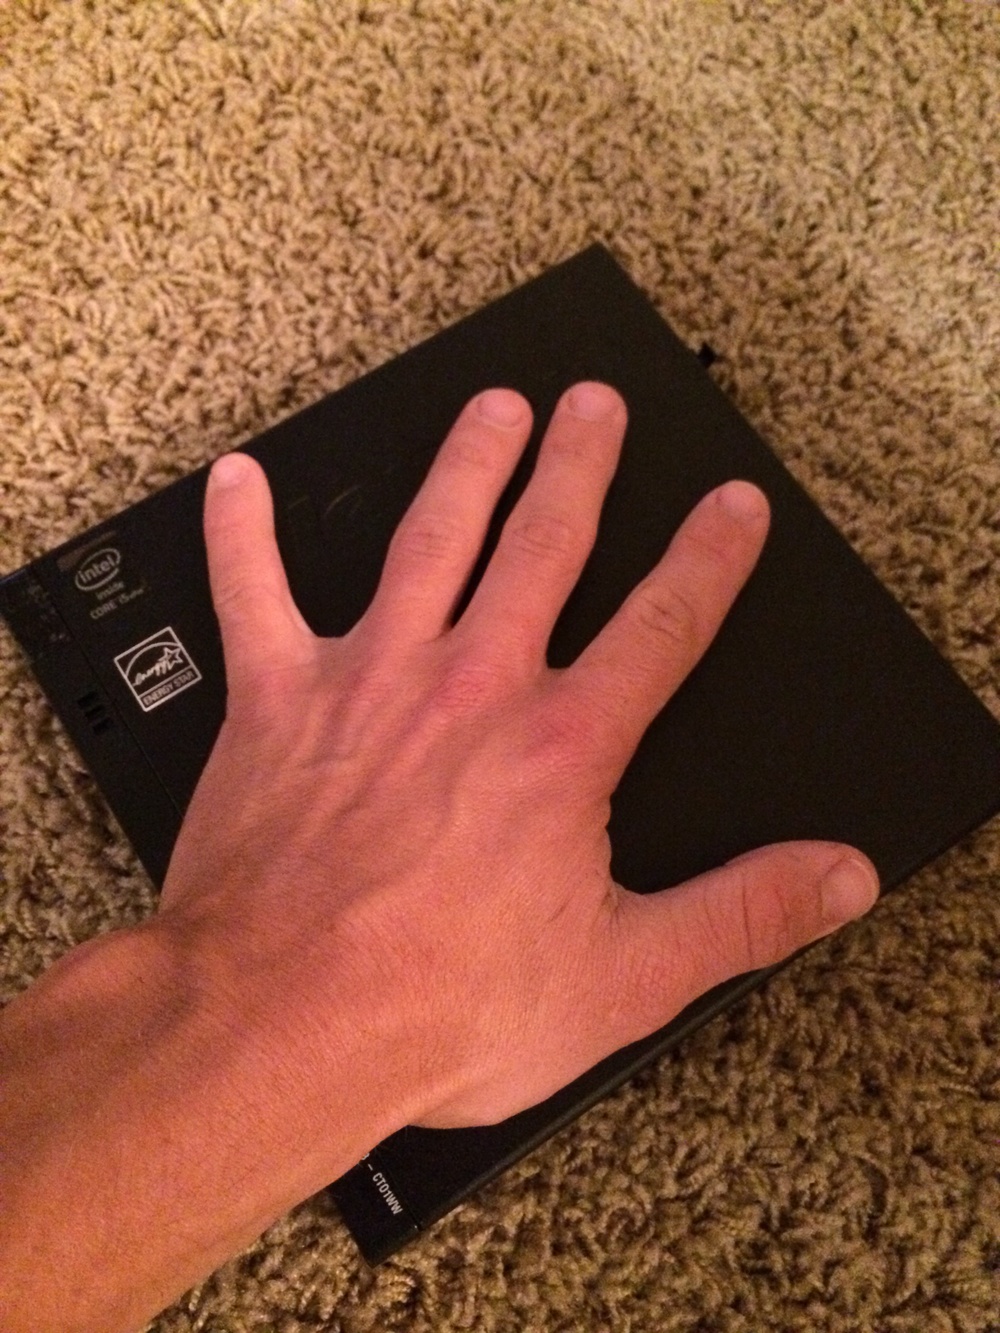
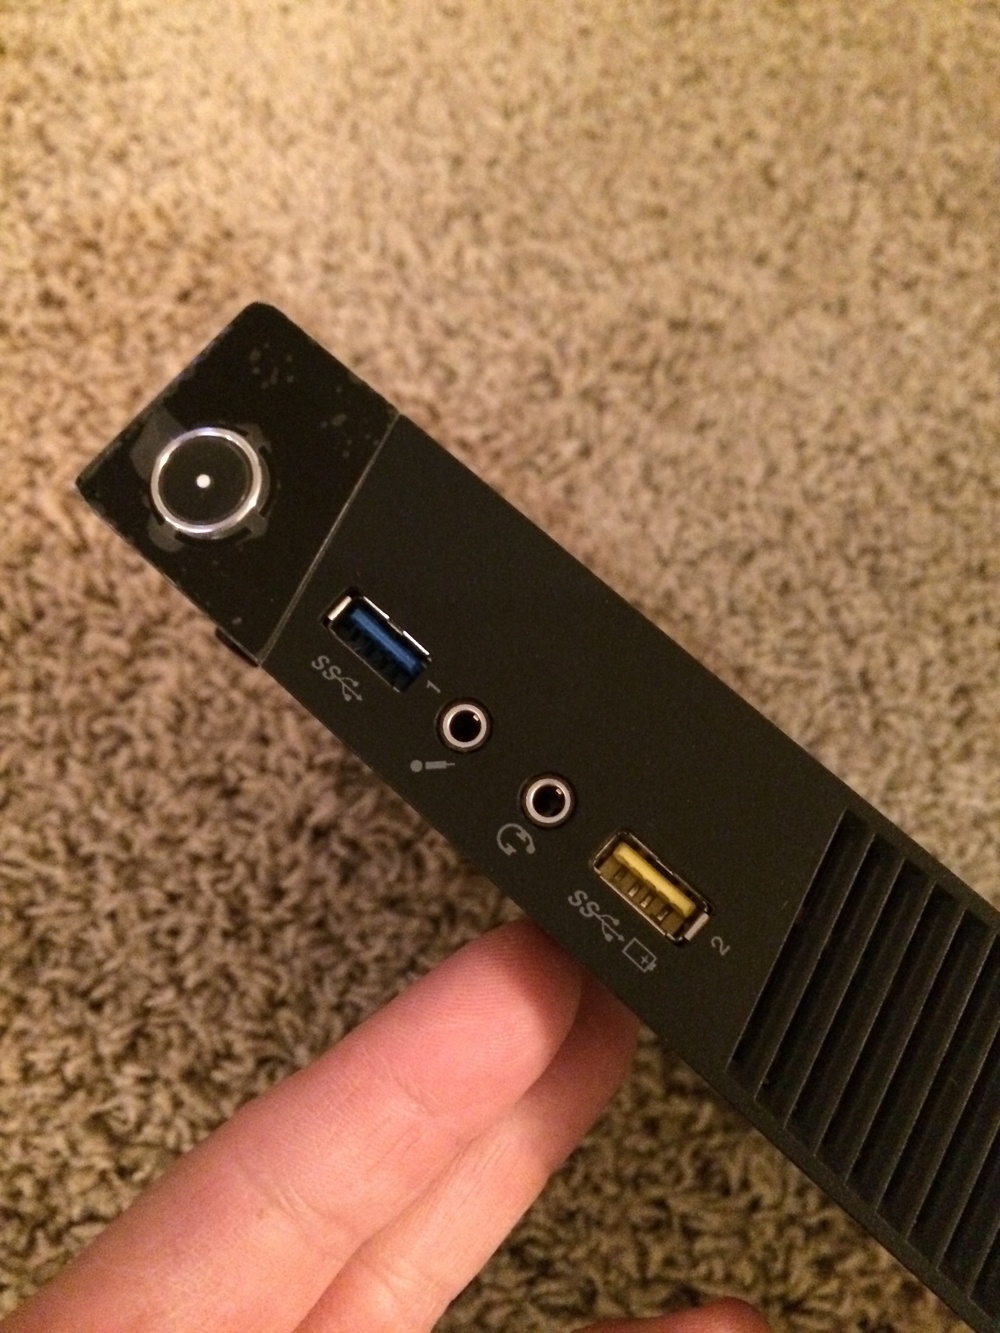
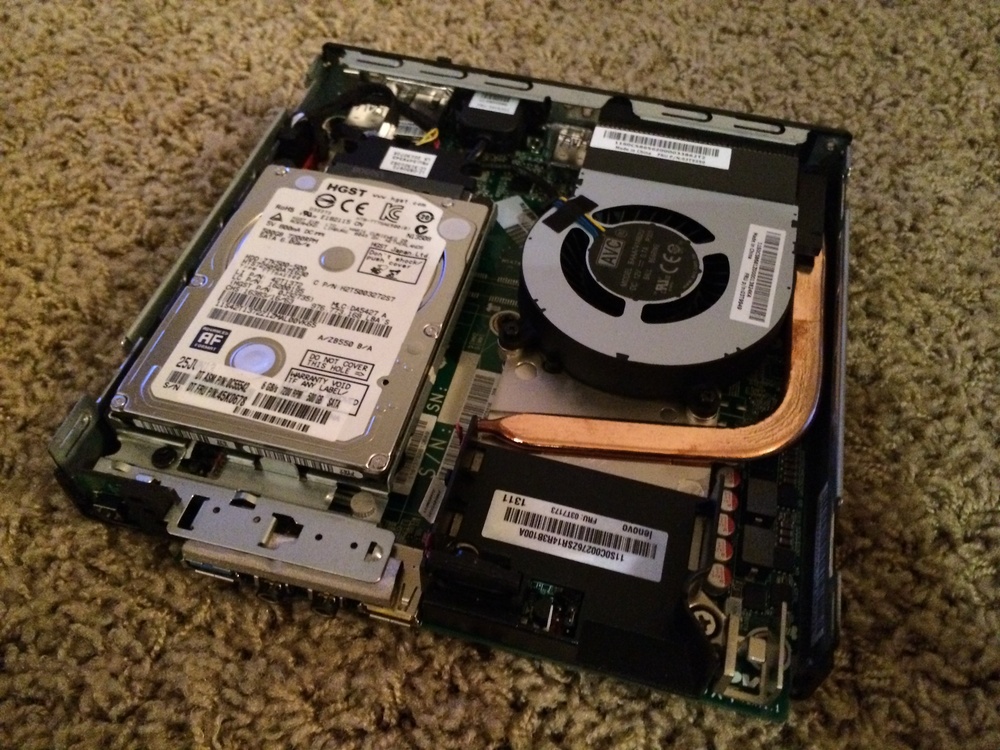
I bought a Synology network attached storage device some while back, and I started experimenting with running Plex on the NAS itself, but the NAS doesn’t have the CPU power to do any sort of intense real-time transcoding. I decided to build a small server to handle all of my Plex needs. I wanted the server to be small, I wanted the server to be silent, and I wanted it to be powerful. I spent some time putting together some potential custom mini-itx builds, but in the end, I couldn’t quite find the right combination of components that would be small and light enough and still powerful. None of the cases out there would fit just right in my small apartment. I somehow stumbled upon the Lenovo M93P Tiny. This is a pre-bulit machine, and it’s quite compact. It has room inside for a 2.5” drive and runs Intel’s most recent Haswell chips. The version I sprung for had an i5 4570T. I could have opted for an i7 CPU, but I thought that might be overkill for my needs.
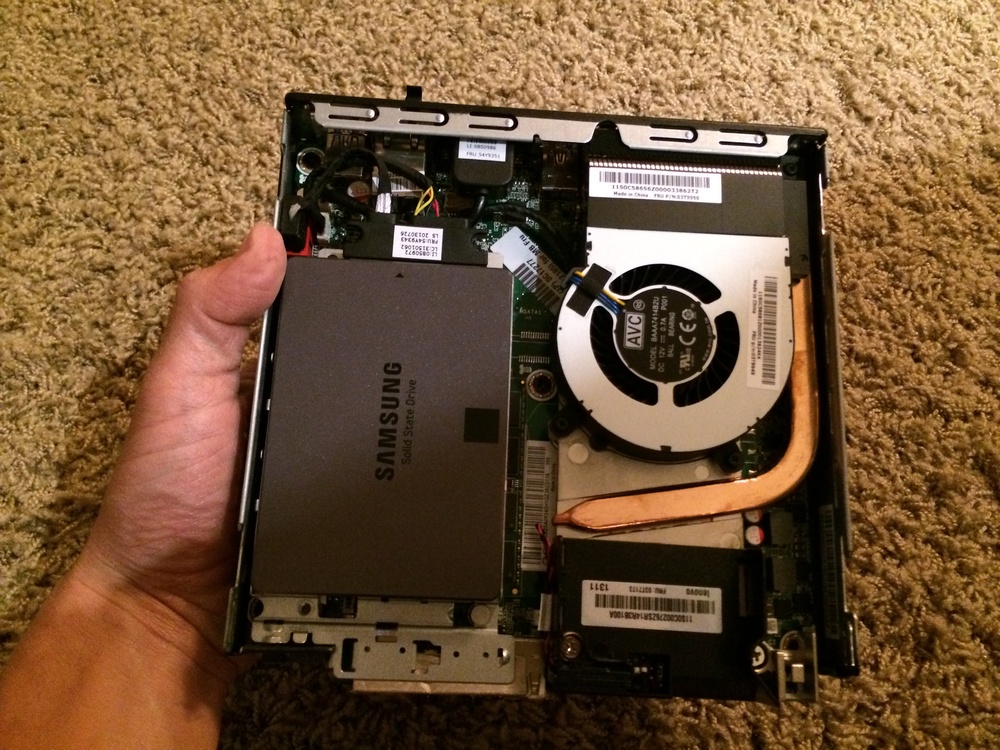
The M93P Tiny doesn’t appear to use a standard motherboard / power supply, but that’s part of the reason it’s so small. And while it doesn’t use a standard mainboard, the components are still easily accessed and swapped. Rather than paying Lenovo to upgrade the internals, I purchased a Samsung 840 EVO SSD and 16GB of RAM. I chose that particular SSD because at the time of purchase, it was widely considered to be one of the fastest SSDs out there. As my media resides on a separate network attached storage unit, there’s no need for much storage space on my actual server. I just need an SSD for the operating system and any applications I add.
Opening up the M93P Tiny is quite easy, and thankfully once, open, all of the components can be easily accessed and removed.
Swapping the hard drive for an SSD and upgrading the RAM was easy. As much as I love the M93P Tiny hardware, I was annoyed that it didn’t include a manual. I had to go online to download the manual in order to learn all of the BIOS commands. I was also annoyed that it didn’t include a Windows 8 CD. I wasn’t planning on running Windows. I was going to run OpenSUSE on it, but I still technically paid for Windows 8. I need to follow up with Lenovo and see why a copy was not included.
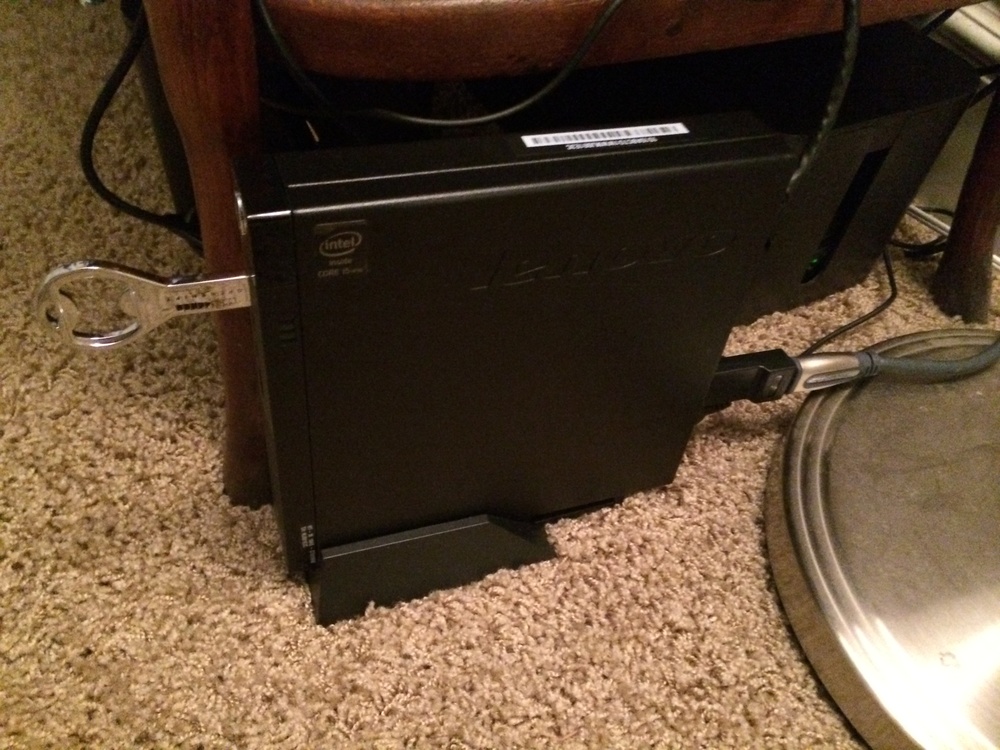
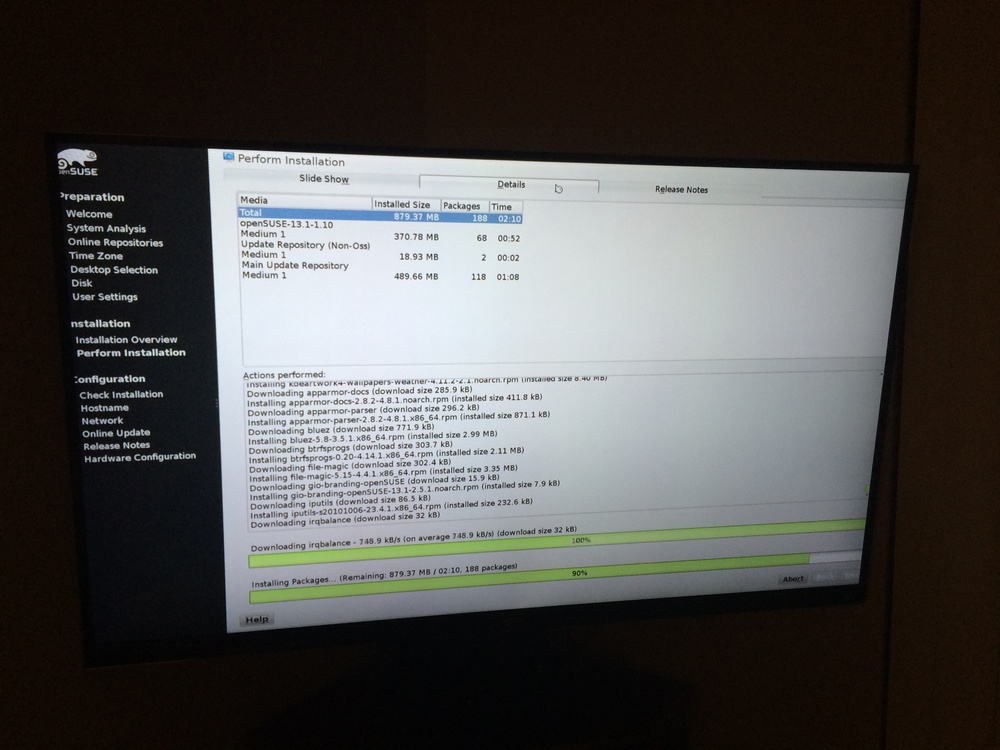
After I swapped out the components, the unit booted up without issue. I created an OpenSUSE USB installer, and I installed the operating system from there. I plugged the system into my HDMI port on my TV, and I installed everything that way. This was just a temporary solution as once the operating system was installed, I planned on administering the system via SSH and VNC, rather than with an actual dedicated screen, keyboard, and mouse. This will be a headless server.
If you’re looking to build your own Plex Media Server, I really recommend taking a look at the Lenovo M93P Tiny. It won’t be cheaper than a DIY build, but there’s a good chance that it will be smaller, quieter, and more powerful. I’ll create future blog posts about how I configured this tiny machine to be my perfect little Plex Media Center.
Last Christmas, my wife and I went with her family on a trip to Mexico. We wanted to make sure we had internet connectivity the whole time so we decided to give TEP Wireless a try. TEP Wireless is an international hotspot rental company. You let them know what country you’re going to, you pay a fee, and a device gets sent to you. When you land in your international destination, you hook up to the device, rather than using your expensive cellular roaming, and just like that, you should have internet.
Needless to say, I had a *very* rough experience the first time around. I won’t recount the entire thing here, but the original post is here.
That experience happened almost a year ago exactly, and a few months ago, I was contacted by Jordan Frank of TEP Wireless. He told me how bad they felt for my original bad experience and asked me if I was willing to give the service another shot. At the time, I didn’t have a need for the service, but when my wife and I ended up planning a trip to Australia, this seemed like the perfect time to give it another go. Read more →
UPDATE: I have given TEP Wireless another try, and it worked just fine for me the second time around. Please see my new post here. I am leaving my original post intact, though, as it is an accurate telling of my previous experience.
I’m not sure how long this post will be, but I’ll just start writing about the whole experience. My apologies in advance if it turns into a bit of a rant, but case it does, let me give you the conclusion up front. DO NOT RENT A WIRELESS HOTSPOT FROM TEP WIRELESS! With that out of the way, let’s continue. Read more →
I really wanted to love my Simple.TV. The premise behind it was so simple, just like the name. The premise of Simple.TV is to essentially create a DVR server that can serve up television to any device with a web browser or a Simple.TV app. It’s just a standard tuner. No cablecard or anything like that. Also, bring your own harddrive. It can stream in HD quality to your local network or anywhere else, bridging functionality of a TiVo and a Slingbox together, except… more simple… That would be great if it worked, but it actually doesn’t work. By “it doesn’t work,” I don’t mean that it isn’t good enough. I mean it actually doesn’t work.
I really wanted to like Simple.TV. I backed them on Kickstarter, ordering two units. I live in San Francisco, but being a Los Angeles native, I wanted to install one of these in my parents’ house so I could stream Lakers games up here, and I planned to install one here. When the Engadget review came out, I thought they were way too harsh. Heck… I was so excited to receive my Simple.TV that I even made an unboxing video. That’s how lame I am!
After I unboxed it, it was time to set it all up! The process of plugging everything in is quite simple. It has a coax passthrough so if you’re already using something like a TiVo, which I am, you can pass coax into the Simple.TV and back out to the TiVo. That worked just fine. There are two ethernet ports. I believe the second one is for passthrough of ethernet, but it is labeled only as Ethernet2, and I can’t find any documentation about it. There isn’t a product manual for the Simple.TV, not even in PDF form online. There’s a power port, and then there’s also a USB port for the external drive. That’s where I hit my first snag. Read more →